Blog

A Winter Guide to a Beautiful Lawn

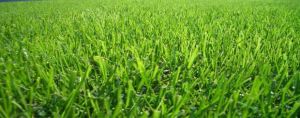
October brings in the Harvest Season for many parts of our World.  In the Metro Phoenix area it brings cooler tempuratures and the opportunity to create a Winter lawn worthy of the term “green carpet”.  Rye grass is considered a Blade Grass and stands straight up.  When given the optimum environment it will reward the owner with unsurpassed deep green color and a soft, cool play area.

There is a short window to seize the optimum moment to create the lawn, which is typically in mid-October.  “Create” is the key word with Rye grass.  Today’s Rye grass varieties are considered Perennial, but usually will not make it through a Phoenix summer unless the lawn is in deep shade.  The growing seaon for Rye grass is from October to June.   In July, as heat soars the sensitive Rye grass will succumb to ambient heat and turn brown.  If you have Bermuda grass lawns, the Bermuda will have to be prepared for the sowing of the seed.  If the Bermuda is prepared too early it will grow back while your Rye seed is trying to grow.  If the Rye grass seed is sowed too late, such as late November, then the cold tempuratures will stunt the growth and the lawns will not thrive until February.  Our goal is to have a perfect lawn by Thanksgiving Day to show off to your friends and family.  The following is a short guideline to follow for achieving a winning winter lawn.


BERMUDA PREPARATION:


Preparation begins with slowly cutting back the amount of irrigation provided to the lawn, up to a 50% reduction in late September.  Do not fertilize the Bermuda in September! This will create competition with your new Rye grass seed.  One week before switching to the Bermuda, cut the irrigation 100%.  Caution should be exercised if you have trees in the Bermuda lawn, as they may wilt.

It is recommended to perform a soil test to determine the fertility of your soil.  This will determine what your Rye lawn will need for nutrients.

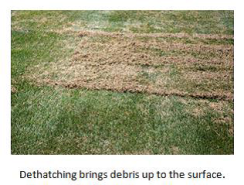
The Bermuda lawn can be dethatched to remove excess layers of buildup that could impede the seed from touching the soil surface.  The final step of preparation is to cut the Bermuda lawn to a height not to exceed ¾ of an inch.  This will protect the seed and prevent damage to the Bermuda lawn for next year.
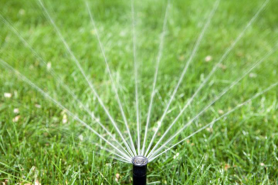
 

SPRINKLER SYSTEM:


The most critical element for the success of germination is proper water availability.  Too dry and the seed will not swell and germinate, too wet and the seed will rot or contract fungal dieseases.  Evenly balanced coverage of sprinklers is the key.

Now you’re ready to sow the seeds of success.


RYE GRASS SUCCESS:


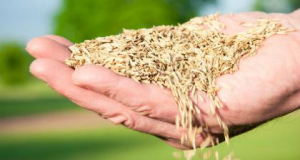
Apply the seed in a criss cross pattern at a rate of ten pounds of seed per thousand square feet.  Along the edges of curbs and sidewalks use a drop type spreader to prevent growing in cracks and granite planters.  Thicker seed coverage does not mean greater success, so stick with the recommended rates.

Set your sprinklers to cover the seed to runoff and stop.  Water the seed every two to three hours and at least once during the night.

The standard 7 day germination cycle will bring the first batch of growth and at 14 days you should have a one inch carpet.  This is the time to apply the first application of fertilizer based on the mixture determined by your soil analysis.  If the first fertilizer application is missed, yellowing will set in.  At 21 days, cut your sprinkler frequency back to once or twice per day.  At 30 days, apply the second application of fertilizer to set the nutrient levels in the grass.

After 30-45 days it should be close to Thanksgiving Day.  The first mow should be done when the grass is at a height of between one to two inches.  It is recommended to keep the cutting height high for the first two mowings until the turf thickens up.  The optimum cutting height for Rye grass is three inches.


SECRETS FOR SUCCESS:

Ants “love” Rye grass seed and they will find and harvest it.  To prevent this, add a tablespoon full of granular bait to the seed applicator at the time of sowing.  There is no defense against birds.  They will win the battle.  Add an extra pound to feed them and they will eventually get full and move on.

Between Thanksgiving and the New Year, we typically experience a frost.  The third application of fertilizer should be done during this time in late November or early December.  Use a fertilizer specially formulated for cold weather with Iron supplements to hold the deep green color through the cold snaps.

Underneath the Mistletoe: The Truth

Underneath the Mistletoe: The Truth

How many of you stole a kiss underneath the mistletoe this holiday season?

Mistletoe is not only the symbol for holiday romance, it is also a common parasite that affects many plants of the native Arizona landscape.  A common misconception is that mistletoe is only associated with winter but certain species of mistletoe actually thrive in the warm, dry climate of the Southwest desert.  Some common desert trees that are susceptible to mistletoe infestation are palo verde, mesquite, ironwood, pine, and juniper.

When most people picture mistletoe, they think about a pretty sprig of bright green, glossy leaves that you hang above a doorway as a decoration.  Not all types of mistletoe resemble the attractive, festive type that we use at Christmas time.  Those species of mistletoe are typically harvested from cottonwood, sycamore, willow, and ash trees.

Desert species of mistletoe appear as a dense bundle of woody twigs nestled in the branches of trees.  You have probably seen them in palo verde or mesquite trees without even realizing it.

Mistletoe is an invasive parasite that steals its water and nutrients from it’s host plant.  This can affect the health of the host plant, weakening the structure.  In some cases heavy infestation can eventually lead to plant death.  Mistletoe contains chlorophyll (unlike many other types of parasites) so it can also produce it’s own source of food utilizing energy from the sun when it can’t get enough from the host plant.

Mistletoe is most commonly spread by birds that are attracted to the small white, pinkish, or green berries that grow in clusters along with the leaves.  The birds eat the berries and then fly to other plants and trees, spreading the berries which stick to their beaks and feet to the new plant.  The berries then attach to the new host and eventually sprout.  Residue from the birds’ droppings can also spread the parasite.

It can be hard to get rid of a mistletoe infestation once you have it.  It is often difficult to access the infected area of the tree, as it tends to grow very high in the canopy where the direct sunlight hits.  If you prune mistletoe, it will often times continue to grow back due to buds still embedded in the surface of the branches.  To prune it properly you need to cut far enough into the branch to remove the buds without damaging the structure of the branch.  The best option would be to remove the infected branch entirely at the base.

Just something to keep in mind next time you are locking lips during the holidays!

Preparation for Seasonal Planting

We are coming up on the time of the year where the frost starts to let up and the mornings feel less and less crisp. February can be tricky in the low desert, a warm week shouldn’t fool you into believing that spring has arrived. There is still a frost risk up until the middle of March so take necessary measures to protect your plants from freezing temperatures.

Mid-March usually brings about the perfect spring weather for planting, a window between the cold frost of the winter and the extreme desert heat of the Arizona summer. It’s a great time to plant roses and citrus trees or start a flower or vegetable garden. This is also the best time to do heavy pruning and fertilize all your plants and trees.

Pruning

Frost damaged branches can be pruned once the weather warms up. Regular pruning/thinning should be performed by reaching into the plant and cutting select stems at the base, eliminating crowded and crossed branches to create a natural appearance. Restorative pruning can be done once every few years on each species and involves the hard cutback of all branches to allow regrowth for the overall health of the plant.

Fertilization

Fertilize plants in the early spring to provide the nutrient boost plants need to recover from the cold months and survive the increasing temperatures. Soil tests can help determine the nutrient requirements of your soil to determine the type of fertilizer to use. A good fertilizer blend can promote healthy plant growth and color.

Irrigation

Temperatures will begin to rise in March, and irrigation will need to be increased to compensate for the greater needs of the plants. Newly planted landscape may need more water during the establishment period so make sure to plan to water accordingly. Make sure to have timers set on your irrigation clocks and adjust for the seasonal needs of your landscape to keep plants properly watered year-round.

Spice up your Landscape with these Colorful Desert Plants

Spring is right around the corner, and it’s the time of year where most of our desert plants show off their color. Try some of these creative combinations in your landscape for an eye-catching display!

Bougainvillea
Deep pink/red flowers

&

Palo Brea
Lime green trunk and soft yellow flowers


Spring Turf Transition

Spring Turf Transition to Warm Season Grass. 

If you have a lawn or even a small accent patch of grass, you know that a lot of care goes in to keeping your lawn looking healthy and manicured.  Here are some tips to help transition your winter rye grass into summer bermuda with the warm season fast approaching:

1. Lower your mow height to reduce the turf canopy of the rye.  Bermuda grass needs sunlight to grow, and the rye grass will hinder its progress with too much shade.

2. Verticut the lawn to allow sunlight to penetrate through the canopy and into the lower dormant bermuda below.

*Verticutting is similar to dethatching but NOT the same.  When you verticut, you thin out only the grass leaf tissue without disturbing the soil or root system.  Use a self-propelled unit with vertical blades to thin out the canopy. Dethatching removes built up organic matter by penetrating much deeper into the soil.

3. Watch your fertilizer rates during this time.  You can use a slow release fertilizer with a low dose of nitrogen to help keep your lawn color a darker green.

4. If your lawn holds standing water, aerating the soil could be helpful to allow that water to disperse and reach the deeper roots within the soil.

5. Increase your mowing frequency to 2 X per week to prevent the turf canopy from re-building.

6. Gradually reduce your irrigation around March/April to stress out the rye grass (when soil temps reach 64 degrees).  A good estimate is to use 70% of your normal water rate.

*It is important not to cut off the water completely!  Attempting to choke out your rye grass by doing this will also stunt the bermuda that is trying to grow back.

7. Once soil temperature is 64 degrees apply a turf transition booster fertilizer to jump start the bermuda growth.

Don’t worry if you have a period where your lawn gets a yellow to brown tint….this is just the rye grass stressing out and dying off.  This is important because the canopy will lessen and allow more sunlight for the bermuda.  Verticutting or raking up this dead material will help even more.  Be patient, and in no time you will have a healthy summer lawn!

Sustainable Tree Pruning Practices

Trees are one of the most valuable assets to a community landscape. Correctly maintaining and caring for trees allows them to become an integral part of the environment and an asset to the overall visual appeal of your property, which can ultimately increase your property value. SDL believes in using sustainable tree care practices to protect this important investment of your community.

A sustainable landscape is designed to be both attractive and in balance with the local climate and environment and it should require minimal resource inputs. Thus, the design must be “functional, cost-efficient, visually pleasing, environmentally friendly and maintainable.”

Our goal is to limit the amount of precious resources we use, the most important resource here in the AZ desert being water. By planting our landscapes with plants that are native to desert regions, respond well to the local climate (heat!), and require less water to survive, we are taking the first step in creating the perfect sustainable landscape.

When it comes to trees it starts by selecting the right type of tree to thrive in desert environments, then selecting the right location to plant it. During the planting stage proper irrigation structure and placement of the root ball in the ground are important elements to creating a sustainable life for each tree. While the tree is growing staking, soil management, and regular pruning should all be conducted with sustainable practices in mind to promote optimal health and appearance.

Proper pruning techniques include removing selected interior and exterior dead, broken, and crossed branches to improve tree shape, appearance, and safety. Have an objective and plan in mind before pruning begins; i.e. crown thinning, crown reduction, or crown raising. Limit pruning to less than 25% of the tree’s canopy at one time. Follow the guidelines for proper pruning to avoid damaging trees by over-pruning, lion’s tailing, tree-topping, etc.

Trees that are properly pruned will maintain their ideal structure and color, and optimal health. Maintaining trees in this optimal state will allow for better growth for the future and protection from potential dangers such as storm damage for a long, sustainable life.


Tree Planting Tips

Tree Planting Tips:

The most important of these tree planting tips is to know how big the tree will get and to make sure there is enough room for it when it grows to full size. I can’t tell you how often people will plant a tree in an area or space too small or where the tree will otherwise conflict with its environment (think power lines). Usually the result is either a requirement for continuous maintenance involving trimming back repeatedly, or the worst case where the tree has to be removed

Tree planting tip 1: Don’t plant a tree if there isn’t enough room for it when full grown. I’m repeating it because it’s important!

Tree planting tip 2: Dig a large enough hole. The most common mistake made when planting a tree is digging a hole too deep and too narrow. There is an easy way to measure how large the hole needs to be; you simply use the root ball as your gauge. Look at the container or root ball, and only dig your hole as deep as the tree is currently sitting in the soil. Too shallow is better than too deep here. If you look at the base of the tree, there is a “trunk flare” where it widens into the roots. This flare should never be below soil, or your tree will not likely survive.

Your hole needs to be 2-3 times as wide as the root ball, wider is better as it makes it easier for the young tree roots to grow into the surrounding soil. The roots are a tree’s support, so you want them to be able to spread out as quickly as possible. If you can imagine a wide, shallow bowl you will have a mental picture of what the hole should look like. If your soil has a lot of clay, the shovel may have smoothed out the soil on the edges of the hole. This can be a barrier for young roots, so take the time to break up the soil all around the sides inside of your hole.

Tree planting tip 3: Make sure your tree is vertical. Bring your tree to the hole, making sure you only move it by the root ball, never the trunk. Take the time to walk around it, and if you can, have someone else observe as well to ensure it is not leaning at all. It is much more difficult if not impossible to correct this later. Make sure your tree is standing straight from all angles, and then kick enough soil around the base of the root ball to stabilize it and keep it from shifting as you fill the hole.

Tree planting tip 4: Fill your hole only 1/3 at a time. You want to make sure that you gradually fill in the hole and pack in the soil firmly, but gently, taking care not to damage the roots. Now is also a good time to add any nutrients if your soil needs it. Phosphorus and potassium are often used to help establish new trees, but do a soil test to confirm if you actually need any in your soil. Also, this is where you want to cut away some of the burlap, and make sure there is no string or wire encircling the tree or roots. Be absolutely sure before burying the roots because this will guarantee the death of your tree if you miss it. There is no need to completely remove the burlap underneath, though, since this will decompose in the soil over time with no ill effects.

After packing in the first 1/3 bring in the next 1/3 and do the same thing; pack it in firmly. Walk around on it and tamp the soil down in order to remove air pockets, but don’t stomp. Your goal is not concrete hard, but you want to make sure the tree will have plenty of support which loose soil does not give. Continue with the final 1/3 of soil, but be sure that you do not bury the trunk flare. You will most likely have some leftover soil. I recommend that you use this to make a built-up wall of soil about 2 inches tall in a circle near the perimeter of your hole’s edges. This serves to capture water and hold it giving it time to percolate into the soil around the root ball. Don’t worry how it looks, we will be covering it with mulch later anyway.

Tree planting tip 4 (optional): Stake your tree. Trees actually grow better and stronger if they are not staked, but depending on the tree and the area’s wind conditions this may be necessary. If you typically have high winds err on the safe side, but only keep the tree staked long enough to ensure root growth. This should be no longer than one growing season.

Tree planting tip 5: Mulch around the tree. You will want to look to the tips of the tree’s branches. The circle this makes around the tree is called the drip line. You want to make a circle of mulch that is about the same size as the drip line of a young tree, and you will apply it evenly 2-3 inches thick. There is no need for more than that, and be sure that you have a 2-3 inch circle around the base of the trunk that is free of any mulch. There is nothing worse than seeing a newly mulched tree with it piled up all around the trunk, and this goes for old trees as well as new ones. This can introduce rot, and is bad for the tree. If your landscaping crew is doing this, they are doing it wrong!

Tree planting tip 6: Follow up care. This is the most important to a tree’s survival. Just because you got it in the ground does not mean there is nothing more to do. Trees need plenty of water their first year, and you may not see they have died until the following season when they don’t leaf out. Do not over-water, but just make sure they are getting no less than 1 inch of water per week. I will typically lay a garden hose near the base of the tree with a slow stream of water for an hour or two once per week, but there are also hose rings available that you can attach that work well for this. Make sure you mulch in both spring and fall, and you should be the proud owner of a happy, healthy tree.

After you’ve completed these simple steps, further routine care and favorable weather conditions will ensure that your new tree or shrub will grow and thrive. A valuable asset to any landscape, trees provide a long-lasting source of beauty and enjoyment for people of all ages. When questions arise about the care of your tree, be sure to consult your local ISA Certified Arborist or a tree care or garden center professional for assistance.